使用 Cohere Embed 的语义搜索
本教程展示了如何使用 Cohere Embed 模型在 Amazon OpenSearch Service 中实现语义搜索。更多信息请参阅语义搜索。
如果使用 Python,您可以使用 opensearch-py-ml 客户端 CLI 创建一个 Cohere 连接器并测试模型。CLI 自动化了许多配置步骤,使得设置更快并减少了出错的可能性。有关使用 CLI 的更多信息,请参阅 CLI 文档。
如果使用自管理 OpenSearch 而非 Amazon OpenSearch Service,请使用蓝图创建到 Cohere Embed 模型的连接器。有关创建连接器的更多信息,请参阅连接器。
在 Amazon OpenSearch Service 中设置嵌入模型最简单的方法是使用 AWS CloudFormation。此外,您还可以使用 AIConnectorHelper notebook 设置嵌入模型。
Cohere Embed 模型也可在 Amazon Bedrock 上使用。要使用 Amazon Bedrock 上托管的模型,请参阅 使用 Amazon Bedrock 上的 Cohere Embed 模型进行语义搜索。
将以 your_ 为前缀的占位符替换为您自己的值。
先决条件:创建 OpenSearch 集群
前往 Amazon OpenSearch Service 控制台并创建一个 OpenSearch 域。
记下域 Amazon Resource Name (ARN);您将在后续步骤中使用它。
步骤 1:将 API 密钥存储在 AWS Secrets Manager 中
将您的 Cohere API 密钥存储在 AWS Secrets Manager 中
- 打开 AWS Secrets Manager。
- 选择 Store a new secret(存储新密钥)。
- 选择 Other type of secret(其他类型的密钥)。
- 创建一个键值对,其中 my_cohere_key 为键,您的 Cohere API 密钥为值。
- 将您的密钥命名为
my_test_cohere_secret。
记下密钥 ARN;您将在后续步骤中使用它。
步骤 2:创建 IAM 角色
要使用在步骤 1 中创建的密钥,您必须创建一个具有该密钥读取权限的 AWS 身份和访问管理 (IAM) 角色。此 IAM 角色将在连接器中配置,并允许连接器读取密钥。
前往 IAM 控制台,创建一个名为 my_cohere_secret_role 的新 IAM 角色,并添加以下信任策略和权限
- 自定义信任策略
{
    "Version": "2012-10-17",
    "Statement": [
        {
            "Effect": "Allow",
            "Principal": {
                "Service": "es.amazonaws.com"
            },
            "Action": "sts:AssumeRole"
        }
    ]
}
- 权限
{
    "Version": "2012-10-17",
    "Statement": [
        {
            "Action": [
                "secretsmanager:GetSecretValue",
                "secretsmanager:DescribeSecret"
            ],
            "Effect": "Allow",
            "Resource": "your_secret_arn_created_in_step1"
        }
    ]
}
记下角色 ARN;您将在后续步骤中使用它。
步骤 3:在 Amazon OpenSearch Service 中配置 IAM 角色
按照以下步骤在 Amazon OpenSearch Service 中配置 IAM 角色。
步骤 3.1:为签署连接器请求创建 IAM 角色
专门为签署您的创建连接器 API 请求生成一个新的 IAM 角色。
创建一个名为 my_create_connector_role 的 IAM 角色,并包含以下信任策略和权限
- 自定义信任策略
{
    "Version": "2012-10-17",
    "Statement": [
        {
            "Effect": "Allow",
            "Principal": {
                "AWS": "your_iam_user_arn"
            },
            "Action": "sts:AssumeRole"
        }
    ]
}
您将使用 your_iam_user_arn IAM 用户在步骤 4.1 中承担该角色。
- 权限
{
    "Version": "2012-10-17",
    "Statement": [
        {
            "Effect": "Allow",
            "Action": "iam:PassRole",
            "Resource": "your_iam_role_arn_created_in_step2"
        },
        {
            "Effect": "Allow",
            "Action": "es:ESHttpPost",
            "Resource": "your_opensearch_domain_arn_created"
        }
    ]
}
记下此角色 ARN;您将在后续步骤中使用它。
步骤 3.2:映射后端角色
按照以下步骤映射后端角色
- 登录 OpenSearch Dashboards,并在顶部菜单中选择 Security(安全)。
- 选择 Roles(角色),然后选择 ml_full_access 角色。
- 在 ml_full_access 角色详情页面,选择 Mapped users(已映射用户),然后选择 Manage mapping(管理映射)。
- 在 Backend roles(后端角色)字段中输入在步骤 3.1 中创建的 IAM 角色 ARN,如下图所示。
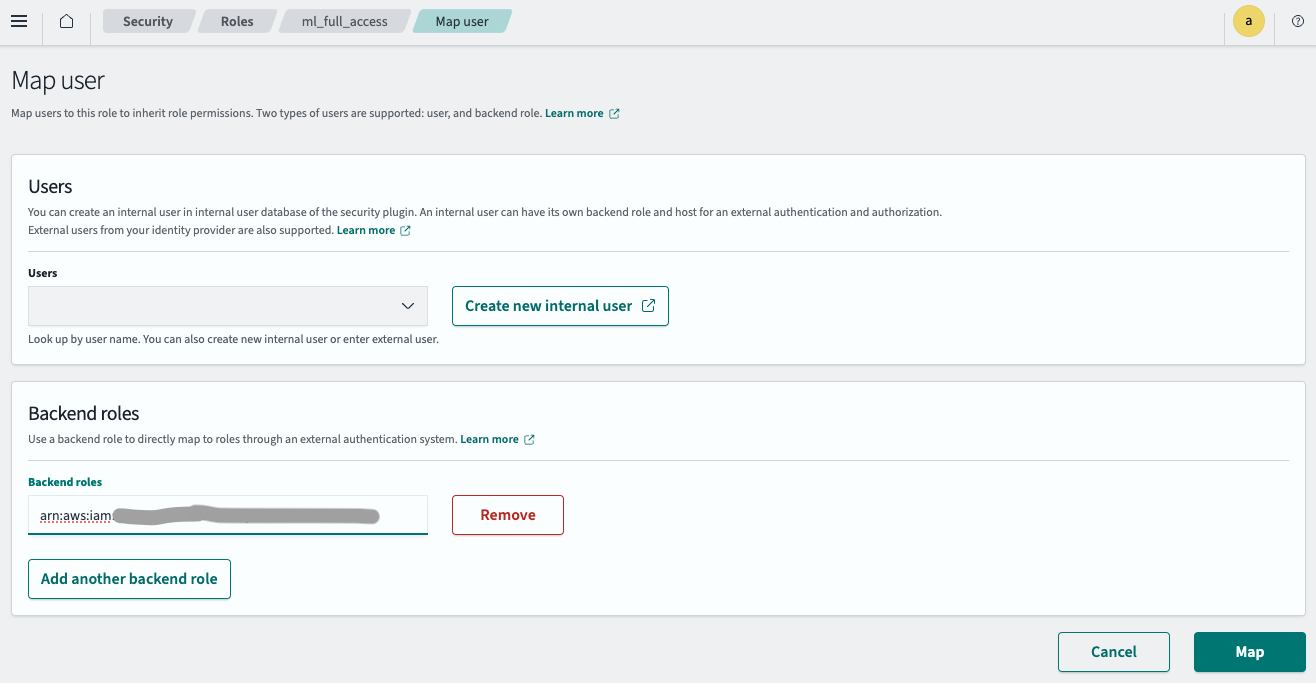
- 选择 Map(映射)。
IAM 角色现已成功在您的 OpenSearch 集群中配置。
步骤 4:创建连接器
按照以下步骤为模型创建连接器。有关创建连接器的更多信息,请参阅连接器。
步骤 4.1:获取临时凭证
使用步骤 3.1 中指定的 IAM 用户的凭证来承担角色
aws sts assume-role --role-arn your_iam_role_arn_created_in_step3.1 --role-session-name your_session_name
从响应中复制临时凭证,并将其配置在 ~/.aws/credentials 中
[default]
AWS_ACCESS_KEY_ID=your_access_key_of_role_created_in_step3.1
AWS_SECRET_ACCESS_KEY=your_secret_key_of_role_created_in_step3.1
AWS_SESSION_TOKEN=your_session_token_of_role_created_in_step3.1
步骤 4.2:创建连接器
使用在 ~/.aws/credentials 中配置的临时凭证运行以下 Python 代码
import boto3
import requests
from requests_aws4auth import AWS4Auth

host = 'your_amazon_opensearch_domain_endpoint_created'
region = 'your_amazon_opensearch_domain_region'
service = 'es'

credentials = boto3.Session().get_credentials()
awsauth = AWS4Auth(credentials.access_key, credentials.secret_key, region, service, session_token=credentials.token)

path = '/_plugins/_ml/connectors/_create'
url = host + path

payload = {
  "name": "cohere-embed-v3",
  "description": "The connector to public Cohere model service for embed",
  "version": "1",
  "protocol": "http",
  "credential": {
    "secretArn": "your_secret_arn_created_in_step1",
    "roleArn": "your_iam_role_arn_created_in_step2"
  },
  "parameters": {
    "model": "embed-english-v3.0",
    "input_type":"search_document",
    "truncate": "END"
  },
  "actions": [
    {
      "action_type": "predict",
      "method": "POST",
      "url": "https://api.cohere.ai/v1/embed",
      "headers": {
        "Authorization": "Bearer ${credential.secretArn.my_cohere_key}",
        "Request-Source": "unspecified:opensearch"
      },
      "request_body": "{ \"texts\": ${parameters.texts}, \"truncate\": \"${parameters.truncate}\", \"model\": \"${parameters.model}\", \"input_type\": \"${parameters.input_type}\" }",
      "pre_process_function": "connector.pre_process.cohere.embedding",
      "post_process_function": "connector.post_process.cohere.embedding"
    }
  ]
}

headers = {"Content-Type": "application/json"}

r = requests.post(url, auth=awsauth, json=payload, headers=headers)
print(r.text)
脚本将输出连接器 ID
{"connector_id":"qp2QP40BWbTmLN9Fpo40"}
记下连接器 ID;您将在下一步中使用它。
步骤 5:创建和测试模型
登录 OpenSearch Dashboards,打开 DevTools 控制台,并运行以下请求来创建和测试模型。
-
创建模型组
POST /_plugins/_ml/model_groups/_register { "name": "Cohere_embedding_model", "description": "Test model group for cohere embedding model" }响应包含模型组 ID
{ "model_group_id": "KEqTP40BOhavBOmfXikp", "status": "CREATED" } -
注册模型
POST /_plugins/_ml/models/_register { "name": "cohere embedding model v3", "function_name": "remote", "description": "test embedding model", "model_group_id": "KEqTP40BOhavBOmfXikp", "connector_id": "qp2QP40BWbTmLN9Fpo40" }响应包含模型 ID
{ "task_id": "q52VP40BWbTmLN9F9I5S", "status": "CREATED", "model_id": "MErAP40BOhavBOmfQCkf" } -
部署模型
POST /_plugins/_ml/models/MErAP40BOhavBOmfQCkf/_deploy响应包含部署操作的任务 ID
{ "task_id": "KUqWP40BOhavBOmf4Clx", "task_type": "DEPLOY_MODEL", "status": "COMPLETED" } -
测试模型
POST /_plugins/_ml/models/MErAP40BOhavBOmfQCkf/_predict { "parameters": { "texts": ["hello world", "how are you"] } }响应包含模型生成的嵌入
 {
   "inference_results": [
     {
       "output": [
         {
           "name": "sentence_embedding",
           "data_type": "FLOAT32",
           "shape": [
             1024
           ],
           "data": [
             -0.029510498,
             -0.023223877,
             -0.059631348,
             ...]
         },
         {
           "name": "sentence_embedding",
           "data_type": "FLOAT32",
           "shape": [
             1024
           ],
           "data": [
             0.02279663,
             0.014976501,
             -0.04058838,]
         }
       ],
       "status_code": 200
     }
   ]
 }
步骤 6:配置语义搜索
按照以下步骤配置语义搜索。
步骤 6.1:创建摄取管道
首先,创建一个使用模型从输入文本创建嵌入的摄取管道
PUT /_ingest/pipeline/my_cohere_embedding_pipeline
{
    "description": "text embedding pipeline",
    "processors": [
        {
            "text_embedding": {
                "model_id": "your_cohere_embedding_model_id_created_in_step5",
                "field_map": {
                    "text": "text_knn"
                }
            }
        }
    ]
}
步骤 6.2:创建向量索引
接下来,创建一个用于存储输入文本和生成嵌入的向量索引
PUT my_index
{
  "settings": {
    "index": {
      "knn.space_type": "cosinesimil",
      "default_pipeline": "my_cohere_embedding_pipeline",
      "knn": "true"
    }
  },
  "mappings": {
    "properties": {
      "text_knn": {
        "type": "knn_vector",
        "dimension": 1024
      }
    }
  }
}
步骤 6.3:摄取数据
将示例文档摄取到索引中
POST /my_index/_doc/1000001
{
    "text": "hello world."
}
步骤 6.4:搜索索引
运行向量搜索以从向量索引中检索文档
POST /my_index/_search
{
  "query": {
    "neural": {
      "text_knn": {
        "query_text": "hello",
        "model_id": "your_embedding_model_id_created_in_step5",
        "k": 100
      }
    }
  },
  "size": "1",
  "_source": ["text"]
}