跨集群搜索
您可以使用 OpenSearch 中的跨集群搜索 (CCS) 来搜索和分析多个集群中的数据,从而从分布式数据源中获取洞察。跨集群搜索默认情况下随安全插件提供,但您需要配置每个集群以允许来自其他集群的远程连接。这涉及到设置远程集群连接和配置访问权限。
目录
身份验证流程
以下序列描述了在使用跨集群搜索从*协调集群*访问*远程集群*时的身份验证流程。您可以在远程集群和协调集群上配置不同的身份验证和授权,但我们建议在两者上使用相同的设置。
- 安全插件在协调集群上验证用户身份。
- 安全插件在协调集群上获取用户的后端角色。
- 该调用(包括已验证的用户)被转发到远程集群。
- 用户的权限在远程集群上进行评估。
设置权限
要查询远程集群上的索引,用户必须具有 READ 或 SEARCH 权限。此外,当搜索请求包含查询参数 ccs_minimize_roundtrips=false(这告诉 OpenSearch 不最小化对远程集群的传出和传入请求)时,用户需要具有以下额外的索引权限
indices:admin/shards/search_shards
有关 ccs_minimize_roundtrips 参数的更多信息,请参阅搜索 API 的参数列表。
roles.yml 配置示例
humanresources:
  cluster:
    - CLUSTER_COMPOSITE_OPS_RO
  indices:
    'humanresources':
      '*':
        - READ
        - indices:admin/shards/search_shards # needed when the search request includes parameter setting 'ccs_minimize_roundtrips=false'.
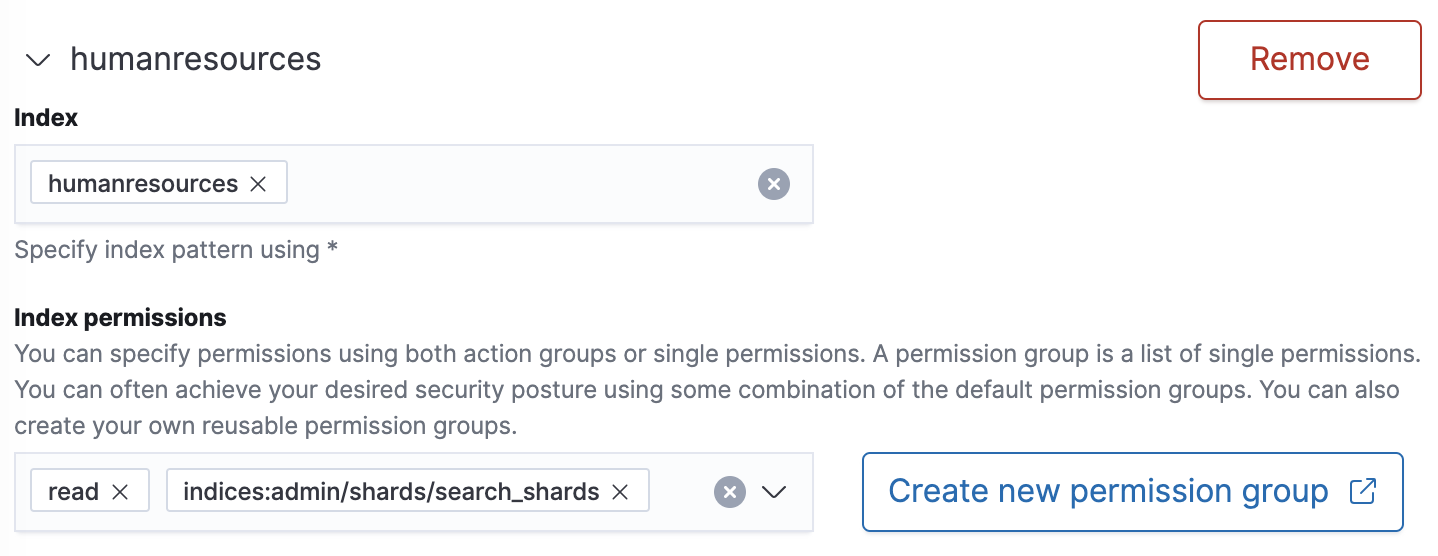
OpenSearch Dashboards 中的角色示例
Docker 示例设置
要定义 Docker 权限,请将以下示例文件保存为 docker-compose.yml,然后运行 docker compose up 以在同一网络上启动两个单节点集群
version: '3'
services:
  opensearch-ccs-node1:
    image: opensearchproject/opensearch:3.1.0
    container_name: opensearch-ccs-node1
    environment:
      - cluster.name=opensearch-ccs-cluster1
      - discovery.type=single-node
      - bootstrap.memory_lock=true # along with the memlock settings below, disables swapping
      - "OPENSEARCH_JAVA_OPTS=-Xms512m -Xmx512m" # minimum and maximum Java heap size, recommend setting both to 50% of system RAM
      - "OPENSEARCH_INITIAL_ADMIN_PASSWORD=<custom-admin-password>" # The initial admin password used by the demo configuration
    ulimits:
      memlock:
        soft: -1
        hard: -1
    volumes:
      - opensearch-data1:/usr/share/opensearch/data
    ports:
      - 9200:9200
      - 9600:9600 # required for Performance Analyzer
    networks:
      - opensearch-net

  opensearch-ccs-node2:
    image: opensearchproject/opensearch:3.1.0
    container_name: opensearch-ccs-node2
    environment:
      - cluster.name=opensearch-ccs-cluster2
      - discovery.type=single-node
      - bootstrap.memory_lock=true # along with the memlock settings below, disables swapping
      - "OPENSEARCH_JAVA_OPTS=-Xms512m -Xmx512m" # minimum and maximum Java heap size, recommend setting both to 50% of system RAM
      - "OPENSEARCH_INITIAL_ADMIN_PASSWORD=<custom-admin-password>" # The initial admin password used by the demo configuration
    ulimits:
      memlock:
        soft: -1
        hard: -1
    volumes:
      - opensearch-data2:/usr/share/opensearch/data
    ports:
      - 9250:9200
      - 9700:9600 # required for Performance Analyzer
    networks:
      - opensearch-net

volumes:
  opensearch-data1:
  opensearch-data2:

networks:
  opensearch-net:
集群启动后,使用以下命令验证每个集群的名称
curl -XGET -u 'admin:<custom-admin-password>' -k 'https://:9200'
{
  "cluster_name" : "opensearch-ccs-cluster1",
  ...
}

curl -XGET -u 'admin:<custom-admin-password>' -k 'https://:9250'
{
  "cluster_name" : "opensearch-ccs-cluster2",
  ...
}
两个集群都在 localhost 上运行,因此重要的标识符是端口号。在这种情况下,使用端口 9200 (opensearch-ccs-node1) 作为远程集群,端口 9250 (opensearch-ccs-node2) 作为协调集群。
要获取远程集群的 IP 地址,首先识别其容器 ID
docker ps
CONTAINER ID    IMAGE                                       PORTS                                                      NAMES
6fe89ebc5a8e    opensearchproject/opensearch:3.1.0   0.0.0.0:9200->9200/tcp, 0.0.0.0:9600->9600/tcp, 9300/tcp   opensearch-ccs-node1
2da08b6c54d8    opensearchproject/opensearch:3.1.0   9300/tcp, 0.0.0.0:9250->9200/tcp, 0.0.0.0:9700->9600/tcp   opensearch-ccs-node2
然后获取该容器的 IP 地址
docker inspect --format='{{range .NetworkSettings.Networks}}{{.IPAddress}}{{end}}' 6fe89ebc5a8e
172.31.0.3
在协调集群上,添加远程集群名称和每个“种子节点”的 IP 地址(端口 9300)。在这种情况下,您只有一个种子节点
curl -k -XPUT -H 'Content-Type: application/json' -u 'admin:<custom-admin-password>' 'https://:9250/_cluster/settings' -d '
{
  "persistent": {
    "cluster.remote": {
      "opensearch-ccs-cluster1": {
        "seeds": ["172.31.0.3:9300"]
      }
    }
  }
}'
所有 cURL 请求也可以使用 OpenSearch Dashboards Dev Tools 发送。
下图显示了一个使用 Dev Tools 发送 cURL 请求的示例。 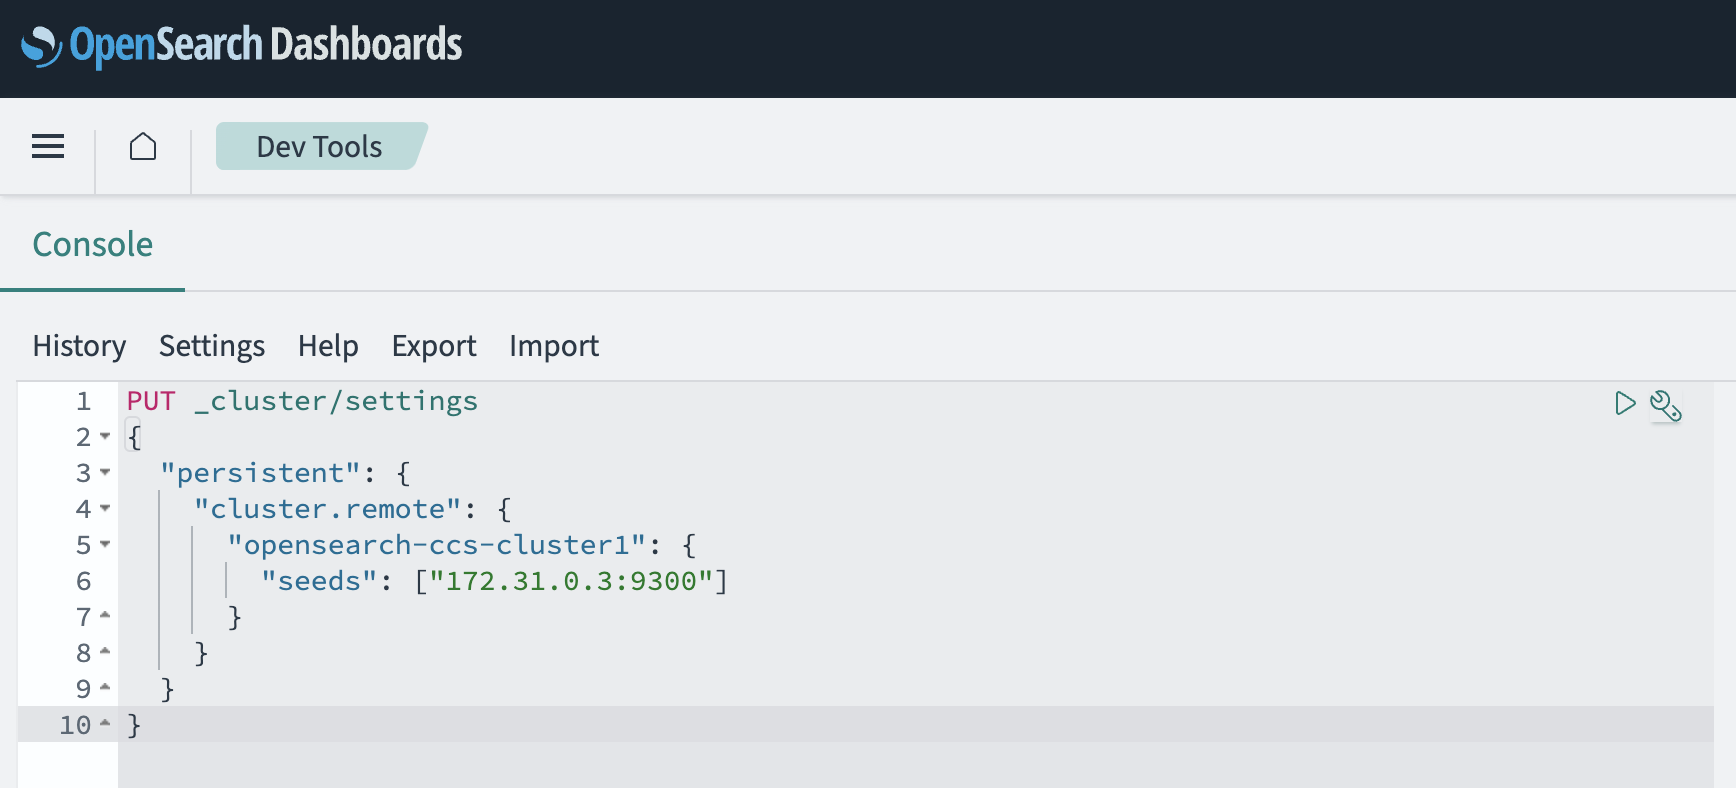
在远程集群上,索引一个文档
curl -XPUT -k -H 'Content-Type: application/json' -u 'admin:<custom-admin-password>' 'https://:9200/books/_doc/1' -d '{"Dracula": "Bram Stoker"}'
此时,跨集群搜索已正常工作。您可以使用 admin 用户进行测试
curl -XGET -k -u 'admin:<custom-admin-password>' 'https://:9250/opensearch-ccs-cluster1:books/_search?pretty'
{
  ...
  "hits": [{
    "_index": "opensearch-ccs-cluster1:books",
    "_id": "1",
    "_score": 1.0,
    "_source": {
      "Dracula": "Bram Stoker"
    }
  }]
}
要继续测试,请在两个集群上创建一个新用户
curl -XPUT -k -u 'admin:<custom-admin-password>' 'https://:9200/_plugins/_security/api/internalusers/booksuser' -H 'Content-Type: application/json' -d '{"password":"password"}'
curl -XPUT -k -u 'admin:<custom-admin-password>' 'https://:9250/_plugins/_security/api/internalusers/booksuser' -H 'Content-Type: application/json' -d '{"password":"password"}'
然后使用 booksuser 运行与之前相同的搜索
curl -XGET -k -u booksuser:password 'https://:9250/opensearch-ccs-cluster1:books/_search?pretty'
{
  "error" : {
    "root_cause" : [
      {
        "type" : "security_exception",
        "reason" : "no permissions for [indices:admin/shards/search_shards, indices:data/read/search] and User [name=booksuser, roles=[], requestedTenant=null]"
      }
    ],
    "type" : "security_exception",
    "reason" : "no permissions for [indices:admin/shards/search_shards, indices:data/read/search] and User [name=booksuser, roles=[], requestedTenant=null]"
  },
  "status" : 403
}
注意权限错误。在远程集群上,创建一个具有适当权限的角色,并将 booksuser 映射到该角色
curl -XPUT -k -u 'admin:<custom-admin-password>' -H 'Content-Type: application/json' 'https://:9200/_plugins/_security/api/roles/booksrole' -d '{"index_permissions":[{"index_patterns":["books"],"allowed_actions":["indices:admin/shards/search_shards","indices:data/read/search"]}]}'
curl -XPUT -k -u 'admin:<custom-admin-password>' -H 'Content-Type: application/json' 'https://:9200/_plugins/_security/api/rolesmapping/booksrole' -d '{"users" : ["booksuser"]}'
两个集群都必须具有用户角色,但只有远程集群需要同时具有角色和映射。在这种情况下,协调集群处理身份验证(即“此请求是否包含有效的用户凭据?”),远程集群处理授权(即“此用户是否可以访问此数据?”)。
最后,重复搜索
curl -XGET -k -u booksuser:password 'https://:9250/opensearch-ccs-cluster1:books/_search?pretty'
{
  ...
  "hits": [{
    "_index": "opensearch-ccs-cluster1:books",
    "_id": "1",
    "_score": 1.0,
    "_source": {
      "Dracula": "Bram Stoker"
    }
  }]
}
裸机/虚拟机示例设置
如果您在裸机服务器上运行 OpenSearch 或使用虚拟机,则可以运行相同的命令,并指定 OpenSearch 集群的 IP(或域)。例如,为了配置用于跨集群搜索的远程集群,请查找远程节点的 IP 或远程集群的域,然后运行以下命令
curl -k -XPUT -H 'Content-Type: application/json' -u 'admin:<custom-admin-password>' 'https://opensearch-domain-1:9200/_cluster/settings' -d '
{
  "persistent": {
    "cluster.remote": {
      "opensearch-ccs-cluster2": {
        "seeds": ["opensearch-domain-2:9300"]
      }
    }
  }
}'
只需指向远程集群中的一个节点 IP 就足够了,因为集群中的所有节点都将作为节点发现过程的一部分进行查询。
您现在可以跨两个集群运行查询
curl -XGET -k -u 'admin:<custom-admin-password>' 'https://opensearch-domain-1:9200/opensearch-ccs-cluster2:books/_search?pretty'
{
  ...
  "hits": [{
    "_index": "opensearch-ccs-cluster2:books",
    "_id": "1",
    "_score": 1.0,
    "_source": {
      "Dracula": "Bram Stoker"
    }
  }]
}
Kubernetes/Helm 示例设置
如果您使用 Kubernetes 集群部署 OpenSearch,则需要使用 LoadBalancer 或 Ingress 配置远程集群。使用以下 Helm 示例创建的 Kubernetes 服务是 ClusterIP 类型,并且只能从集群内部访问;因此,您必须使用外部可访问的端点
curl -k -XPUT -H 'Content-Type: application/json' -u 'admin:<custom-admin-password>' 'https://opensearch-domain-1:9200/_cluster/settings' -d '
{
  "persistent": {
    "cluster.remote": {
      "opensearch-ccs-cluster2": {
        "seeds": ["ingress:9300"]
      }
    }
  }
}'
代理设置
您可以在代理后面运行的集群上配置跨集群搜索。有许多方法可以配置反向代理,并且有各种代理可供选择。以下示例演示了基本的 NGINX 反向代理配置,不带 TLS 终止,尽管有许多代理和反向代理可供选择。为了使此示例正常工作,OpenSearch 必须启用传输和 HTTP TLS 加密。有关配置 TLS 加密的更多信息,请参阅配置 TLS 证书。
先决条件
要使用代理模式,请满足以下先决条件
- 确保源集群的节点能够连接到配置的
proxy_address。 - 确保代理可以将连接路由到远程集群节点。
代理配置
以下是用于 HTTP 和传输通信的基本 NGINX 配置
stream {
    upstream opensearch-transport {
        server <opensearch>:9300;
    }
    upstream opensearch-http {
        server <opensearch>:9200;
    }
    server {
        listen 8300;
        ssl_certificate /.../3.1.0/config/esnode.pem;
        ssl_certificate_key /.../3.1.0/config/esnode-key.pem;
        ssl_trusted_certificate /.../3.1.0/config/root-ca.pem;
        proxy_pass opensearch-transport;
        ssl_preread on;
    }
    server {
        listen 443;
        listen [::]:443;
        ssl_certificate /.../3.1.0/config/esnode.pem;
        ssl_certificate_key /.../3.1.0/config/esnode-key.pem;
        ssl_trusted_certificate /.../3.1.0/config/root-ca.pem;
        proxy_pass opensearch-http;
        ssl_preread on;
    }
}
HTTP 和传输通信的监听端口分别设置为 443 和 8300。
OpenSearch 配置
远程集群可以通过使用以下命令配置为指向 proxy
curl -k -XPUT -H 'Content-Type: application/json' -u 'admin:<custom-admin-password>' 'https://opensearch:9200/_cluster/settings' -d '
{
  "persistent": {
    "cluster.remote": {
      "opensearch-remote-cluster": {
        "mode": "proxy",
        "proxy_address": "<remote-cluster-proxy>:8300"
      }
    }
  }
}'
请注意 代理配置 部分中先前配置的端口 8300。